Friday, June 28, 2019

Computer မွာ AutoPlay ပိတ္နည္း

How to close Autoplay?

Computer မွာ ေနာက္ကြယ္ကေန Auto play ျဖစ္ေနတာေတြ ရွိတတ္ပါတယ္
အဲ့ဒါေတြကို ပိတ္တဲ့ နည္းေလး ေျပာျပေပးမွာပါ

အရင္ဦးဆံုး Run box (window key + R) ကေန gpedit.msc ဆိုတဲ့ Local Group Policy Editor ေလးကို ေခၚလိုက္ပါ.. (or) Search box ကေန ရိုက္ရွာရင္လည္း ရပါတယ္

group policy ေလး က်လာပီဆိုရင္ေတာ့ ေအာက္မွာ ျပထားတဲ့ ပံုေလးေတြအတိုင္း လုပ္ေပးလုိက္ပါ

1. Computer Configuration ကို အရင္ ပိတ္ပါ

ပံုပါအတုိင္း အဆင့္ဆင့္ ေရာက္ပီဆိုရင္ Turn Off Play ကို double click ႏွိပ္လိုက္ပီဆိုရင္ အခု box က်လာမွာပါ  ပံုမွန္ဆို Nof Configured ျဖစ္ေနမွာပါ အဲ့ဒါကို Enabled ေရြးေပးပီး Apply >> OK ႏွိပ္လိုက္ပါ..


Computer configuration ကို ပိတ္ျပီးျပီဆိုုရင္ေတာ့ ေနာက္ထပ္ User Configuration ကိုလည္း ပိတ္ေပးရပါမယ္
User Configuration ကိုလည္း ထိုနည္းတူစြာပင္ လုပ္ေဆာင္ရပါမည္


computer configuration & user configuration ေတြ ပိတ္ပီးရင္ေတာ့ Autoplay ေတြကို ေအာင္ျမင္စြာ ပိတ္ပီးသြားပါပီ 

ေနာက္ထပ္ တစ္ခုက control panel ထဲက ပိတ္ရမွာပါ..
1. Open control panel
2. Search Autoplay
3.Uncheck Use Autoplay for all media and devices
4. Save
Search box မွာ Autoplay လုိ႕ရိုက္ထည့္


Autoplay ထဲေရာက္သြားရင္ Use Autoplay for all media and devices ဆိုတာ အမွန္ျခစ္ေလး ျဖဳတ္ေပးပီး Save လိုက္ပါ ဒါဆို Autoplay ေတြ ပိတ္သြားမွာပါ...

ဖတ္ရႈ႕ေပးတာ ေက်းဇူးတင္ပါတယ္...
အဆင္ေျပၾကပါေစ..


Saturday, January 12, 2019

" Windows 10 မွာ လိုအပ္မယ့္ Shortcut ေတြ "


§  Windows Key + A (Action Centre) = notification ေတြကို ၾကည့္ႏုိင္တယ္။
§  Windows key + I (Windows 10 မွာအသစ္ပါလာတဲ့ setting app)
§  Windows key + k (Connect panel) = PC နဲ႔ တျခား device ေတြ ဥပမာေျပာရရင္ smart TV လိုဟာမ်ဳိးနဲ႔ ကြန္ရက္ခ်ိတ္ၿပီး ဆက္သြယ္ႏိုင္ပါမယ္။
§  Windows key + X (alternative smart menu) = ဒီ menu က သာမန္အားျဖင့္ဆုိရင္ start button ေပၚမွာ ညာကလစ္ေထာက္ၿပီးေခၚမွ ရတာမ်ဳိးပါ။ ဒီ menu ကေန control panel နဲ႔ Device Manager ဆီ အလြယ္တကူ သြားႏုိင္ပါတယ္။
§  ဖုိင္ေတြနဲ႔ပတ္သက္ၿပီးၾကည့္ခ်င္ရင္ Windows key + E (File explorer Window) = သူ႕ထဲမွာ Quick access tab က ေရြးၿပီးသားျဖစ္ပါတယ္။
§  window + H ( Share Charm) =  သူကေတာ့ Windows 8 မွာေတြ႕ခဲ့တဲ့ fearture ပါ။ ဒီေနရာကေန Website ၊ Video ၊ Photo ေတြကို တျခားလူဆီ အီးေမးလ္ကတစ္ဆင့္ Share ႏိုင္ပါတယ္။ Windows 10 မွာပါတဲ့ Massaging app နဲ႔ Social media ေတြဆီလည္း အလြယ္တကူ သြားႏုိင္ပါတယ္။ Shortcut သံုးၿပီးေခၚႏိုင္တဲ့အထဲမွာ Windows 10 ရဲ႕ accessibility setting လည္းပါတယ္။
§  Screen ေပၚက စာေတြဖတ္ဖုိ႔ အခက္အခဲျဖစ္ေနလား။ window + enter (Narrator app) ။Screen ေပၚမွာ ေပၚလာသမွ်စာသားေတြကုိ အသံထြက္ၿပီးဖတ္ျပပါမယ္။
§  window + u (Ease of access panel)
§  window + D (all minimize)
§  window + L (Lock)
§  Windows key နဲ႔ အေပါင္းလကၡဏာကုိ တြဲၿပီးႏွိပ္ရင္ Magnifier ကုိ ဖြင့္ေပးပါမယ္။ screen ေပၚက စာလံုးေတြ ေကာင္းေကာင္းျမင္ရၿပီလား။ မျမင္ရေသးရင္ အဲဒီကီးႏွစ္ခုကို ထပ္ႏွိပ္ေပးပါ။ စာလံုးေတြကို ထပ္ၿပီး အႀကီးခ်ဲ႕ေပးပါမယ္။ စာလံုးေတြ ျပန္ခ်ဳံ႕ခ်င္ရင္ Windows key နဲ႔ အႏႈတ္လကၡဏာကုိ တြဲၿပီးႏွိပ္ပါ။ မွန္ဘီလူးထဲကေန ထြက္ခ်င္ရင္ Windows key နဲ႔ Escape ကို တြဲႏွိပ္ပါ။
§  run box ေကန shortcut ေခၚသုံးနည္း ဂ်ီေတာ့ ကို program ကေနမဖြင့္ပဲ Run box ကေန ဖြင့္ခ်င္တယ္ဆိုရင္...G talk shortcut ကို desktop ေပၚေရာက္ေအာင္အရင္ပိုပါၿပီးရင္rename လsုပ္ပါ။ gt လို႔ နာမည္ေပးလိုက္။ၿပီးရင္ အဲဒီ shortcut ကို cut လုပ္။ၿပီးရင္ C:\windows \system32 ထဲကို paste လုပ္လိုက္ပါ။ ဒါဆိုရင္ run box ကေန gt လို႔ ရိုက္ထည့္ၾကည့္ပါက Gtalk တက္လာပါလိမ့္မယ္။။

Friday, January 11, 2019

IP Configuration

 - Display Connection Configuration = ipconfig /all 
 - Display DNS Cache Contents = ipconfig /displaydns
 - Delete DNS Cache Contents = ipconfig /flushdns
 
 - Refresh DHCP and Re-register DNS = ipconfig /registerdns
 - Release All Connections = ipconfig /release
 - Renew All Connections = ipconfig /renew
 - Modify DHCP Class ID = ipconfig /setclassid
 - Display DHCP Class ID = 
ipconfig /showclassid

Saturday, December 15, 2018

Computer ႏွင္႔ Technology ဆိုင္၇ာ အက်ဥ္းခ်ံဳး သေကၤတ တစ္ခ်ိဳ႔


BIOS : Basic Input- Output System
CAD : Computer Aided Design
CAM : Computer Aided Manufacturing.
CD : Compact Disk
Computer : Common Oriented Machine Particularly united and use under Technical and                         Educational Research
CPU : Central Processing Unit.
CUI : Command User Interfaces.
DOS : Disk Operating System.
E-Mail : Electronic Mail
FAX : Far Away Xerox
GUI : Graphical User Interfaces.
HTML : Hyper Text Markup Language.
HTTP : Hyper Text Transfer Protocol
ISH : International Super Highway.
Internet : International Network
MAC : Media Access Control.
MODEM : Modulation- Demodulation
MPU : Micro Processor Unit.
LDU : Liquid Display Unit
LAN : Local Area Network
LCD : Liquid Crystal Display.
LLL : low Level Language.
PROM : Programmable Read Only Memory.
RAM : Random Access Memory
PIN : Personal Identification Number
ROM : Read Only Memory

WAN : Wide Area Network
VDU : Visual Display Unit.
WLAN : Wireless Local Area Network.
Wi-fi : Wireless Fidelity
WWW. World Wide Web.

Saturday, December 1, 2018

Window Defender မွာ Real-time Protection ပိတ္မရရင္

Real-time Protection ကို Settings ထဲက Window Defender Setting မွာ ပိတ္လိုု႕မရရင္ ေနာက္ထပ္ တစ္နည္းရွိပါေသးတယ္ ဒါကေတာ့ Group Policy Management ကေနသြားပိတ္ရမွာပါ
1. Search box မွာ Group Policy Management Console ကိုေရးပီး ရွာပါ (or) Run box ကေန gpedit.msc
2. Click Computer Configuration and Administrative templates
3. Windows Components ကို ႏွိပ္လိုုက္တာနဲ႕ ေဘးမွာ Folder ေတြ အမ်ားျကီးက်လာပါလိမ့္မယ္ အဲ့ကေနမွ Windows Defender Antivirus ကိုရွာပီး Click ထပ္ႏွိပ္ေပးပါ
4. Windows Defender Antivirus ထဲကို ၀င္ပီးပီဆုိရင္ Real-time Protection ကိုု ေတြလိမ့္မယ္ Double Click ႏွိပ္လိုက္ရင္ ေအာက္မွာ ျပထားတဲ့ ပံုအတုိင္းေတြ႕ရပါလိမ့္မယ္...
အဲ့ကေနမွ Turn off real-time protection ကို Right Click ႏွိပ္ Edit ကို ႏွိပ္ပီး က်လာတဲ့ box မွာ Enable လုပ္ OK ေပ့ါ


ေပးထားတဲ့ အဆင့္ေတြအတိုင္းလုပ္ပီးသြားပီဆုိ Real-time Protection ကို ပိတ္ပီးသြားပါပီ..
အခုလို ဖတ္ေပးတဲ့အတြက္ ေက်းဇူး အထူး တင္ရွိပါတယ္.


Wednesday, June 27, 2018

Window မွာ Activator run မရလို႕ Error ျဖစ္ေနရင္

    window activator Run မရလို႕ Cannot ဆုိတဲ့ Error ျဖစ္ေနရင္ anti-virus Software ေတြကို Disable လုပ္ပီး window defender ပါ ပိတ္ေပးရမယ္ 
    အခုေျပာျပေပးမွာပါ window defender ပိတ္နည္းပါ

    Windows Defender Settings ပိတ္နည္း
    1. Open Settings.
    2. Click on Update & security.
    3. Click on Windows Security
    4. Click on Open Windows Defender Security Center
    5. Click on Virus & threat protection
    6. Click on Virus & threat protection Settings
        7.Real-time proteection မွာ On ျဖစ္ေနတာေလးကို ႏွိပ္လုိက္ပါ


    Off ျဖစ္သြားရင္ ေအာက္က ပံုေလးလို ျဖစ္သြားမွာပါ


    အကယ္လုိ႕ အခုလို ပံုစံအတုိင္း ပိတ္မရဘူးဆုိရင္ေတာ့ ေနာက္ထပ္ တစ္နည္း ရွိပါေသးတယ္

    အခု link ေလးကို ၀င္ျပီး ေလ့လာေပးပါ


    Ethernet Icon ေတြ ဖ်က္မယ္... , Ethernet Icon တွေ ဖျက်မယ်...

    (Zawgyi)

    Network Connection မွာ Ethernet icon ေတြ အရမ္းမ်ားေနလို႕ စိတ္ညစ္ေနပါသလား...

    Right Click ႏွိပ္ပီးလည္း Delete လို႕မရ ကဲ အဲ့ဒါေတြကို ဘယ္လို ဖ်က္ရမလဲ ေျပာျပေပးပါ့မယ္...

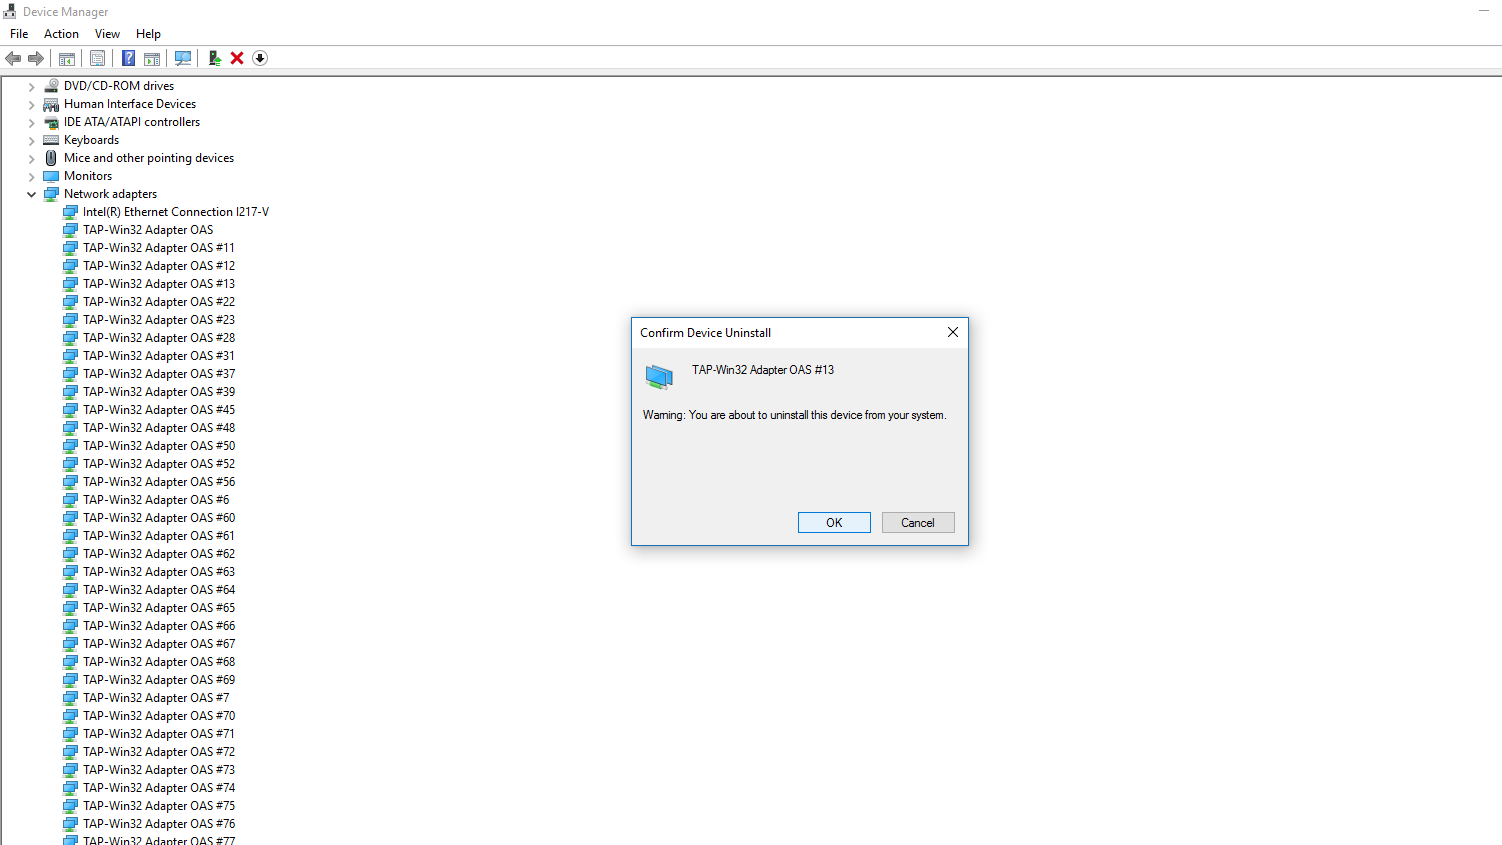
    1. Device Manager ထဲကို ၀င္မယ္ (Search box ကေန Device Manager ဆိုပီးလည္း ၀င္ရသလို , run box ကေန devmgmt.msc ဆုိပီး လည္း ၀င္လို႕ရပါတယ္)
    2. Network Adapter ကိုေရြးေပးပါ။

    3. Tap- win ဆိုတာေတြ အကုန္ Right Click ႏွိပ္ Uninstall >> OK
    အကုန္ uninstall ျပီးပီဆိုရင္ေတာ့ Network Connection မွာသြားျကည့္ပါ အရင္လို Network icon ေတြ အမ်ားျကီးရွိမွာ မဟုတ္ေတာ့ပါဘူး...
    မွတ္ခ်က္ ။ ။ ကိုယ့္ computer ရဲ႕ Network icon ပါ uninstall လုပ္မိမယ္ေနာ္ အဲ့ဒါေလး သတိထားေပးပါ

    (Unicode)

    Network Connection မှာ Ethernet icon တွေ အရမ်းများနေလို့ စိတ်ညစ်နေပါသလား...

    Right Click နှိပ်ပီးလည်း Delete လို့မရ ကဲ အဲ့ဒါတွေကို ဘယ်လို ဖျက်ရမလဲ ပြောပြပေးပါ့မယ်...
    1. Device Manager ထဲကို ဝင်မယ် (Search box ကနေ Device Manager ဆိုပီးလည်း ဝင်ရသလို , run box ကနေ devmgmt.msc ဆိုပီး လည်း ဝင်လို့ရပါတယ်)
    2. Network Adapter ကိုရွေးပေးပါ။
    3. Tap- win ဆိုတာတွေ အကုန် Right Click နှိပ် Uninstall >> OK
    အကုန် uninstall ပြီးပီဆိုရင်တော့ Network Connection မှာသွားကြည့်ပါ အရင်လို Network icon တွေ အများကြီးရှိမှာ မဟုတ်တော့ပါဘူး...
    မှတ်ချက် ။ ။ ကိုယ့် computer ရဲ့ Network icon ပါ uninstall လုပ်မိမယ်နော် အဲ့ဒါလေး သတိထားပေးပါ